|
planted for one month in this miracle house, Becky's Greenhouse Good morning, quite the experience with the eclipse. We didn’t try to see it but it sure was creepy out when it happened in the afternoon. Hard to explain with the lower light level.
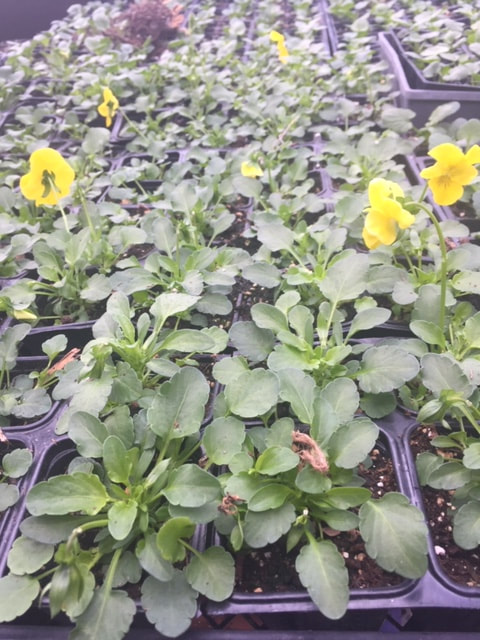
Today we will have 4 of us planting. My planters have been having health concerns for themselves or their other halves. But I am hoping that they are getting answers about their health. We have been planting with a part crew, but today shall be good. The weather will be warmer, sun will be out, but right now at 7:45 AM it is still cloudy. Here is an example of the planting sheet I give each of us to work from. Dianthus ideal select raspberry 03/18/24 Natural Beauty 500 one tray Plant in 1204 trays _____________trays 6-10” baskets with 5 in each Date planted _________ By _____________ Then we talked about where to place them in the greenhouse. I am doing things a little differently this year. We would use the tall racks to put trays of planted flats on as soon as they were planted but being on shelves on top of each other it created some shadows. Now I am taking off the growing tables the planted flats we have done earlier and leaving them on the tall rack. Seems to be working better. At the bottom of the tall rack, I am putting succulents because the shade doesn’t seem to bother them. In fact, they like it better. I use the tall racks instead of putting the trays into the second greenhouse with heating and watering it is easier to have them in one greenhouse. Now when it gets warmer out, I can push the racks outside for you to shop from. Now pansies, cabbage, broccoli, cauliflower are on them. I have been doing this for 35 years but can always change things to make the growing easier and better. It is my hours to move the plants, but it is easier to water and heat one greenhouse. Larry says that we fill that one greenhosue 4 times with what we plant and move plants in and out on the long wagon racks. The long wagons will go into the other greenhouse when it is too cold at night or bad weather during the day. The picture is of the wave pansies that I planted one month ago. I told you they would grow because the greenhouse is a miracle house. The fun part of growing plants is watching them grow. We have a fertilizer injector that injectors fertilizer into the water. We use 20-10-20 general-purpose water-soluble fertilizers. I try to use that fertilizer every time I water. A little about what we do before the greenhouse is open with plants for your gardening needs. I am there every afternoon (Monday- Friday) if you want to come and get seed potatoes and onion sets. Tomorrow I will talk about when you should plant the garden. Soil temperature, moisture, and the right time to plant the vegetables. Till next time this is Becky Litterer, Becky’s Greenhouse, Dougherty Iowa beckmall@netins.net 641-794-3337 cell 641-903-9365
0 Comments
image from gardenseus.com Cloudy morning and looks like we will have the clouds all day. We will have less sunlight with the eclipse, but we will not be able to see it. We will have to watch it as others take pictures and video.
I am back to writing each day. GOAL this week is to get lots of plants planted. Four of us will be planting so that should be what will happen. A little stressed out with the plants in the plug trays and need to be planted. BUT it will happen, I promise you. Pam and I attended the NIACC gardening seminar on Saturday. We had a good time. I took stuff but I did a little presentation about what we do with planting, talking about the plant plugs, the potting mixture, and then the gardeners got to plant. As Pam told me, when I started that presentation, I got into my teaching voice. I do love to share and to educate. Interesting weather, temperature says warm, but we have been having that North wind or the wind out of the east that has been very cold and strong. Change in weather for sure. This week (Monday-Friday) I am open every afternoon. Seed potatoes and onion sets are in. You will see what the work in progress is with planting. I am posting what the Farmers’ Almanac says about April weather. It seems so far it is right on for us here in the Midwest. We are having much needed rain. This is good. It’s time to look at weather predictions for April 2024! Will April have enough showers to bring out those May flowers? Let’s see what sort of spring weather April has in store for us this year. April 2024 Weather Forecast Overall, April temperatures will be warmer than normal from New England to Florida and westward across the Southeast and the Deep South into Texas, as well as north and west through the Rockies to the Pacific coast and in much of Alaska and eastern Hawaii. Elsewhere, temperatures will be near to below normal. Conditions will be wetter than normal in the Southeast, from southern Florida across the Deep South into the southern Plains and northward across the Heartland into Minnesota, as well as from the northern Rockies across the Pacific Northwest and over much of Alaska. Elsewhere, precipitation will be near to below normal. In Canada, April temperatures will be warmer than normal across eastern Quebec, the Yukon, and the Northwest Territories, and near to below normal elsewhere. Precipitation will be above normal from Atlantic Canada westward through the Prairies and in the Northwest Territories and near to below normal elsewhere. Taken from https://www.almanac.com/april-forecast Till next time this is Becky Litterer, Becky’s Greenhouse, Dougherty Iowa beckmall@netins.net 641-794-3337 cell 641-903-9365 image from blogpotatoworld.com Today's post is my radio show for April 6th on KLMJ radio 104.9 at 7:20 AM. I thought I would share what I read for my radio show. I have been doing this radio show for 27 years. Let me know if you listen to the radio show, and what you think of adding it to the blog page. This is for the ones that don't hear me on the RADIO.
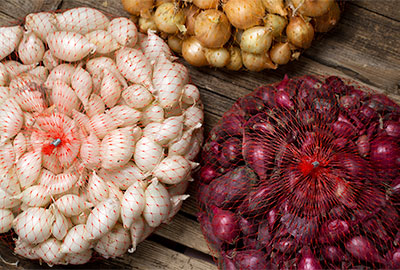
Good morning welcome to my garden show, gardening, and you. I am Becky Litterer from Becky’s Greenhouse in Dougherty. This show is about more than just than just the different aspects of gardening, it’s about how we can help you with your gardening needs. WOW What an awesome week here at Becky’s Greenhouse. More truckloads of plugs made it to Dougherty. We are busy PLUGGING away. Pun on the word plugging as that is what we are planting. Plants are growing well. The 2 walls dividing the greenhouse as less to heat in the winter came down, so now it is the full greenhouse. We have had some nice rain and sounds like it will rain again Sunday thru Monday. Up to ½” of inch and we will take it. I am glad that the temperature is more seasonable as the garden will come when it is closer to the right time on the calendar. I will be open next week in the afternoon Monday thru Friday. We are busy planting, but I do have seed potatoes, and onion sets in. Kennebec, Yukon Gold, Norland, Red Pontiac. Kennebec potatoes though not suitable for commercial farming are still loved by gardeners who love to grow their own potatoes. This potato is making such an impact in the culinary world of potato use. Finer restaurants are switching to Kennebec potatoes for many kinds of dishes and for a variety of reasons. Kennebec is a large potato that has a light tan skin of a uniform appearance. It does not have as many ‘eyes’ as many other potatoes and has a fleshy white inside. The skin is so thin and peels off fast, though you can cook it unpeeled. It has a nice oval shape that is attractive on the plate, unlike others that come in an irregular shape. Kennebec is an easy growing potato type that produces a high yield of potatoes. It resists blight and other diseases during its growing time. It can also last long enough when stored well. Kennebec potatoes take approximately eighty to one hundred days to reach harvest. One of the bonuses of growing your own potatoes is because you can eat them when you want. You can choose to eat the young new potatoes with peas and gravy which is a popular delicacy. Or you can allow them to reach maturity, harvest, and store them for use throughout the winter. After all the hard work of growing the Kennebec potatoes, go ahead and enjoy a plateful of fresh fries. You will notice the difference between these potatoes and the others. You can cook your potatoes in a different way and store them as long as you would like. Then, you will not only enjoy growing this staple food but enjoy eating them as well. What a wonderful potato journey. Yukon Gold is an early potato variety that matures in 65 to 85 days. It has thin, yellow skin and dense, buttery flesh. The tubers tend to set high on the plant, so pay careful attention to hilling during the season. Avoid planting too far apart to avoid large tubers and hollow heart. Norland potatoes are an early-season variety with red skin and white flesh. They are particularly well-suited to harvesting as new potatoes. Norland potatoes are disease resistant and take only 70-90 days to reach maturity in the garden1. They are good for boiling and making french fries and potato chips, but not good for baking. Red Pontiac potatoes are an all-purpose variety with sweet, white flesh and red skin. These versatile potatoes are perfect for growing as new potatoes, making mashed potatoes, or storing them long-term. They also grow well in heavy clay soil and maintain their quality over time. With a midseason growth cycle of 80-100 days, Red Pontiac potatoes are a great choice for gardeners of all skill levels. Whether you are an expert potato grower or just starting out, these red beauties are sure to please. Onion sets are small onion bulbs grown in the previous season. The partially formed bulbets are around ¾ inch in diameter, making them easier to plant than seed. They develop into full-size bulbs quickly after planting, in approximately 3½ months. Sets tend to produce stronger, more vigorous plants compared to seed, ensuring larger yields. We have onion sets in red, white and yellow. They are really nice this year. Nice and big! Nearly all onion sets are sold as either yellow, white or red onions. There are a lot of varieties within each color of bulb, but in general, the flavors can best be described as follows: Yellow Onions – Yellow onions are the workhorse of the three and are the most common. They have a good balance of flavor and hold up well in all kinds of dishes or for fresh eating. White Onions – White onions tend to be a bit crisper, with a stronger flavor than yellow. They are one of the best choices for salsa. They hold up to cooking quite well. Red Onions – The mere color profile of red onions makes them perfect for using in salads, salsas and more. They can be a bit strong for some, especially if allowed to age. They make an excellent young onion too as their flavor tends to be crisp and still sweet. I looked online at the price of seed potatoes and onion sets. Here at Becky’s greenhouse, we can beat those prices hands down. Stop in next week in the afternoon if you are looking for seed potatoes and onion sets. Onion plants are ordered not here yet. Yes we need to talk about Larry’s Garage. He is back to work after total knee replacement. He is doing great. He must figure out how to do some things differently, but he is figuring that out. I am glad he is back to work. if you do know of some work you would like him to do for you just give us a call or stop in. Larry has spots open for appointments so if you need any work done, He is back to work and open so give him a call at 641-794-3337 Thanks and stay well. This part of the radio show, sharing a message I have done for over 27 years. The Lord’s words of encouragement are always good to hear. It is hard but we need to listen, care, and pray for all. Pray has power. Thanks to all that tell me they hear me on the radio, and they enjoy the messages. I am only the messenger in this message and all I do. I try to have the Lord’s hand on all of it. Bible verse Psalm 92:4 For You, O Lord, have made me glad by Your works, at the deeds of Your hands I joyful sing. The source of happiness Focusing on our problems will prevent us from rejoicing and being glad. Look for the good in your life and your joy will increase. You might have a problem, but if you focus on what's good, then you will discover there are some good things in your life also. The world is full of people and situations that don't please us, so if we are waiting for perfect circumstances to make us happy, we will be waiting forever. That's why we must learn to base our happiness and joy not on outward circumstances, but on the Lord's presence inside us. Thankfully, we can learn not to fret or have any anxioty about anything but in everything to give thanks and praise to God. Then the peace that passes all understanding will be ours. Let us pray. Till next week, this is Becky Litterer, from Becky’s Greenhouse Dougherty Thanks to all of you that listen to this program, Blessings all stay safe and stay well. Larry and Becky image from Pinterest Good morning. I have been meaning to take pictures to show you what we are doing. BUT I get busy in the greenhouse and I forget. I will try to do the pictures today. We are plugging away…pun with the word plugging away which we are using each day are the plugs.
Sun is visible with the blue clear sky. Temperature is 36 degrees with a high today 49 and a low of 27 degrees. The doors will be open in the greenhouse. LOVE the sun. This is early spring, you want to be outside, but too early to plant there is work you can do. Here are some ideas that you can do. Essential Gardening Chores for Early Spring by Robin Sweetser It’s spring! How do you get the outdoor garden ready? We’re going to gently get started, being careful not to wake up those overwintering beneficial insects if it’s still too cool or wet. Here are my early spring gardening tasks and tips. I ( the author Robin) spent the end of February in the Texas Hill Country, where the gardens are at least three months ahead of mine in New Hampshire. The redbuds, irises, and poppies were in bloom, and the famous bluebonnets were popping up here and there. Gardening in Texas is quite a different experience from gardening in New England. While gardeners in Texas can grow cold-hardy crops all winter long, they need to get the warm-weather plants up and growing before the deadly hot weather sets in. While most of the country loves summer, they worry about long heat waves and drought. Needless to say, it was hard to come home to a frozen garden. I had to stop myself from jumping in to clean up too early. Early Spring Gardening Chores If you live in an area of the country that is closer to New Hampshire than it is to Texas, here are some early spring chores you may need to start working on: Don’t be too eager! If your garden is like a soupy mud pie, let it dry out some more before you even think about stepping foot in it. Soggy soil is easily compacted. If you absolutely must get in there, use stepping stones or put down boards to walk on. See when the soil is ready for planting. Gently press frost-heaved plants back into the ground. Delay clean up until overwintering beneficial insects wake up. Wait until you’ve had several days of 50 degree or higher temperatures to give them a chance of survival. The first thing I do is pick up sticks. There are always loads of sticks and branches that have fallen over the winter. It is a good first step before raking and gives you a chance to assess how things have overwintered while you walk around gathering fallen branches. Gently rake the early bloomers first so they can poke up out of the soil without having to lift leaves and debris too. Clip off old, tattered leaves of hellebores and epimediums, perennials that bloom with the first breath of spring. Give ornamental grasses their annual haircut before new growth begins. Leave 8-12 inches of old stubble standing above the crown to keep spring rains from flattening soft new growth and to preserve this year’s growing tips. Wait until after spring-blooming shrubs blossom to prune them. Instead, finish up pruning broken branches. This is a good time to remove dead rose canes. Rake, rake, rake, especially where bulbs, daylilies, and peonies are planted to avoid snapping off brittle new shoots. Peony tips are very brittle when they first emerge. Take care when cleaning up around them. Before the buds open up and leaves emerge, dig up and move or divide overgrown perennials. It will be less stressful for them. Take time to remove any weeds as they pop up. They are much easier to deal with now. Violets may be pretty in bloom, but they are a terrible weed in my garden. It’s easy to pull them out now, and very difficult to wait until later. If you haven’t tested your soil in a while, now is a good time to take a sample and send it off to be tested. You will receive guidelines for the proper amendments to add. Ready to plant vegetables? Before planting, check the soil temperature. Peas need at least 45 degree soil to germinate. Or look to nature and wait until the forsythia blooms to plant them. Other vegetables that can be planted early include beets, carrots, radishes, spinach, lettuce, and chard. See the Almanac’s best planting dates by zip code. Pot up begonia tubers and other summer flowering bulbs to give them a head start. If the kids are home, enlist their aid in the garden. It will give them some fresh air and exercise and can serve as an outdoor classroom. I’ll have more on gardening with children in a future post. Taken from https://www.almanac.com/15-early-spring-gardening-tasks Till next time this is Becky Litterer, Becky’s Greenhouse, Dougherty Iowa beckmall@netins.net 641-794-3337 cell 641-903-9365 image from anglianagardener.co.uk Good morning…sun is visible with clear, blue skies. BUT it is only 22 degrees outside. Dress accordingly. When I walked on the yard, it is frozen, so this is good with the moisture we had.
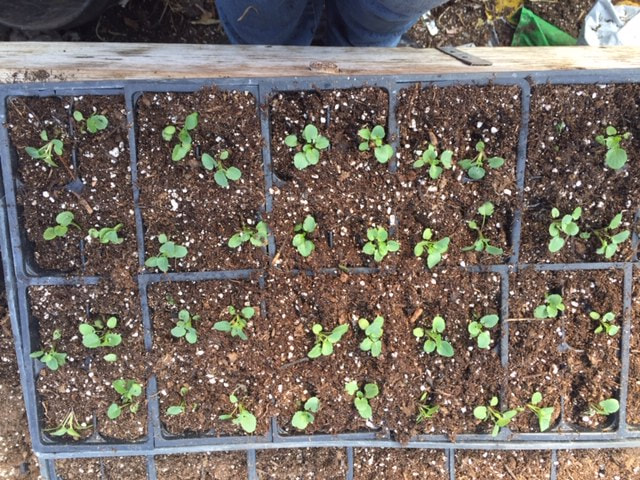
We just unloaded 2 trucks with boxes of plug trays. It is 11 boxes with 3 or 4 plug trays in each with each plug tray having 40, 144, 288 or 500 plants in each. YES, that is lots of plants. We are in full production of planting. In the morning, I need to make up planting sheets for each plug tray that is being planted that day. I can’t make them up in the winter because I don’t know what the freight charge will be. What size container to plant in? 1203, 1204, 804 regular, 804 deep, single pots, baskets, or quart pots? And I must find the place to put the trays to grow in the greenhouse after they have been planted, so that might mean moving planted trays to tall carts or cleaning off tables with stuff. We will need to find the containers and the trays that hold them for the planting that day. I need to water every day all we have planted, and you can imagine the amount of dirt in the small plugs, so the plug trays need water each day. I am planting seeds and working with succulents. The days go quickly with this planting time. But I do love it and watching the plants grow is just very fulfilling. I will post pictures later today on out day in the greenhouse. Stay warm, stay safe. Till next time this is Becky Litterer, Becky’s Greenhouse, Dougherty, Iowa beckmall@netins.net 641-794-3337 cell 641-903-9365 image from Pinterest Good morning. We are now having winter, but the much needed moisture is coming. Snow, rain, sleet and right now at 8:00 AM it is snowing. Moisture is soaking in as there is no frost. This is good.
I haven’t posted in the last few days. We have had family here from Wyoming. We had our family Easter, plus confirmation of a grandchild. World wind of family time and it all was good. Thankful for all of it. Now it is time to get back to the greenhouse. My list is long and I will keep working on it. Stay safe, and today it is going to have wind chills. STAY WARM. How do you keep Easter lilies alive after they bloom? By Robin Sweetser How do you keep Easter lilies alive after they bloom? Do Easter lilies multiply? Are Easter lilies poisonous to pets? Learn all about caring for Easter lilies! Learn all about the pure white Easter lily (Lilium longiflorum). The fragrance of an Easter lily is a sign that spring is here! But like most true lilies, if left to nature, they actually wouldn’t blossom until late summer. The potted plants for sale around the Easter holiday have been tricked into blooming for us at Easter by greenhouses that pot up the bulbs in the fall and treat them to a long cooling period—about 1,000 hours in cold but not freezing temperatures. After the lilies start to sprout, they are given enough warmth and light to get them growing and budding in time for holiday sales. This can be tricky for growers to time just right since the date for Easter can vary from late March to late April. How to Keep Your Easter Lily Growing After Easter If you have a fragrant Easter lily for the holiday and want to enjoy it for years to come, you will need to plant it outside. The bulbs are winter-hardy in zones 5 to 8, but the plants do not do well in hot, humid climates. To prepare the bulb for planting outdoors, let the flowers fade and keep watering until the leaves die back to the stem. Harden off the bulb by placing the plant outside each day for longer periods of time until it acclimates to being outdoors. After the last frost, plant it 4 to 6 inches deep in rich, well-drained soil where it will get full morning sun and some afternoon shade. Like clematis, these lilies like their heads in the sun but their feet in the shade. If you can’t shade the base of the plant, use mulch to keep the roots cool. Cut the stem off at the soil line and mark where you have planted. Fertilize it twice over the summer, and if you haven’t already mulched it, apply some mulch in the fall for winter protection. If all goes well, your bulb should bloom again the next summer. As the leaves mature, they will start to turn yellow. Make More Lilies! To make more lilies, dig up your bulbs and separate the small bulblets in the fall. Replant them 4 to 6 inches deep and 6 to 12 inches apart. It will take 2 to 3 years for them to reach a blossoming size, but it will be worth the wait when you have a whole row of them in bloom! They are not trouble-free, though. Deer love to eat the plants, especially the buds, and the lily leaf beetle can decimate an entire planting if not kept in check by vigilant hand-picking or spraying with neem oil or Spinosad. Scarlet lily leaf beetles might be small, but they are voracious chewers and will ruin your lilies if left unchecked. Beware: Easter Lilies Poisonous to Cats Finally, if you received an Easter lily as a gift, be aware that all parts of this plant are poisonous and especially toxic to cats. If they eat even a small amount, it could cause kidney failure and kill them, so if you suspect Fluffy has been chewing the leaves or licking the pollen, get her to the vet right away! Even though the plants are toxic, dogs and humans are not severely affected and would have to eat a large quantity of the plant to become sick. Taken from https://www.almanac.com/how-grow-and-care-easter-lillies Till next time this is Becky Litterer, Becky’s Greenhouse Dougherty Iowa beckmall@netins.net 641-794-3337 cell 641-903-9365 image from blog.cwf-fef.org Good morning, calm before the storm. Snow starts later after midnight and it is a clipper so out of here by 10:00 AM on Friday. Temperature is 27 at 8:00 AM high of 43 degrees low tonight of 28 degrees. Weather snow coming through the night and early Friday morning. Stay safe.
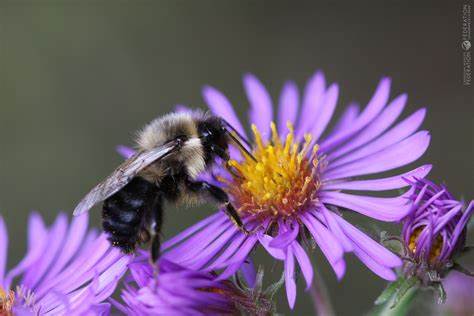
I need to sell lots of this perennial for flowering in the fall. I am going to plant them for one reason. HONEY BEES. They are looking for pollen and food in the fall, and this perennial will do it. So please, think about planting it for them. Planting, Growing, and Caring for Asters by Catherine Boeckmann Asters enliven the garden in late summer and early fall when many flower blooms are fading—providing a late-season treat for the monarch butterfly, too! Plant these deer-resistant native perennials in midspring to keep the color going. Learn all about planting, growing, and caring for asters. About Asters Cold-hardy perennials with daisy-like flowers, aster flowers are the pollinator stars of the garden from late summer through fall. Growing 1 to 6 feet tall, depending on variety, these upright flowering plants bear cheerful star-shaped flower heads ranging from purple to white to blue. Even though there are more than 600 aster species, the two most commonly encountered asters in home gardening are the New England aster (Symphyotrichum novae-angliae) and the New York aster (S. novi-belgii). Several years ago, the Aster genus was split into multiple genera. Aster now covers most European and Asian asters, while those native to North America belong to Symphyotrichum. Some hybrid varieties are available in showy colors, yet “wild type” species native to your region are generally a wise choice for the ecologically-minded gardener despite them not being quite as flashy as the cultivated varieties in some cases. Learn more about recommended varieties further down this page. Aster is versatile: Depending on the height, it’s suitable for borders, rock gardens, or wildflower gardens. As well as being a valuable pollinator plant for bees and butterflies, its tasty seed heads are sought by cardinals, chickadees, finches, nuthatches, and many other seed eaters. PLANTING Asters prefer areas with cool, moist summers and cool nights in sites with full to partial sun. In warmer climates, asters do not like the hot midday sun. Soil should be moist but well-drained and loamy. Wet clay soil will lead to root rot, and dry sandy soil will lead to plant wilt. Mix 2 to 3 inches of compost into the soil before planting. When to Plant Asters The best time to put young aster plants in the ground is in mid-to-late spring after the danger of frost has passed. (See local frost dates.) Or, you can plant mature, potted asters when available at garden centers (typically in the late summer or early fall). Asters can be grown from seed, but germination can be uneven. If desired, plant seeds in the fall or start them indoors in the winter. How to Plant Asters When planting young aster plants outside in the spring, space them 1 to 3 feet apart, depending on the type and how large they’re expected to get. Fully-grown asters, such as those available in late summer or early fall, should be planted about 3 feet apart. If planting seeds, sow 1 inch deep in pots or flats and refrigerate them for 4 to 6 weeks to simulate winter dormancy. This cold period will kick-start germination. Water well and spread mulch around the plants to keep the soil cool and prevent weeds. Asters are highly attractive to pollinators, especially bees and butterflies. GROWING Add a thin layer of compost (or a portion of balanced fertilizer) with a 2–inch layer of mulch around the plants every spring to encourage vigorous growth. If less than 1 inch of rain falls weekly in summer, water regularly. But beware. Many asters are sensitive to too much or too little moisture. They will lose their lower foliage or not flower well. Watch for stress and try a different watering method if your plants lose flowers. Stake the tall varieties to keep them from falling over. Pinch or cut back asters by one-third once or twice in the early summer to promote bushier growth and more blooms. Don’t worry; they can take it! In winter, cut back asters after the foliage has died, or leave them through the winter to add some off-season interest to your garden. Birds may munch on the seeds, too. Note: Aster flowers that mature fully may reseed themselves. The resulting asters may not bloom true to their parent. (In other words, you may not get the same color flowers you planted initially!) Divide every 2 to 3 years in the spring to maintain your plant’s vigor and flower quality. RECOMMENDED VARIETIES The most common asters available in North America are the New England aster (Symphyotrichum novae-angliae) and the New York aster (Symphyotrichum novi-belgii). Both of these plants are native to North America and are great flowers for pollinators. We recommend planting a native species of aster over a non-native species when possible, so talk with your local Cooperative Extension or garden center about which species are best suited to your area. Look for varieties with disease resistance. North American Asters New England asters (S. novae-angliae): Varieties have a range of flower colors, from magenta to deep purple. They typically grow larger than New York asters, though some varieties are smaller. New York asters (S. novi-belgii): There are many, many varieties of New York asters available. Their flowers range from bright pink to bluish-purple and can be double, semi-double, or single. Blue wood aster (S. cordifolium): Bushy with small, blue-to-white flowers. Heath aster (S. ericoides): A low-growing ground cover (similar to creeping phlox) with small, white flowers. Smooth aster (S. laeve): A tall, upright aster with small, lavender flowers. Aromatic aster (S. oblongifolium): Multi-branched at the base, stiff upright stems, with lavender or pink flowers. European/Eurasian Asters Frikart’s aster (Aster x frikartii) ‘Mönch’: Hailing from Switzerland, this mid-sized aster has large, lilac-blue flowers. Rhone aster (A. sedifolius) ‘Nanus’: This aster is known for its small, star-shaped, lilac-blue flowers and compact growth. HARVESTING Cut asters for flower arrangements when blooms are just beginning to open. Vase life is 5 to 10 days. Asters have side shoots, which will continue to develop. These can be cut for indoor arrangements once they are the size you like. Taken from https://www.almanac.com/plant/asters Till next time this is Becky’s Greenhouse, Dougherty Iowa beckmall@netins.net 641-794-3337 cell 641-903-9365 image from gardenersworld.com Good morning. Colder out this morning. The temperature is 20 degrees with a high today of only 38 low tonight of 28 degrees. I heard this morning; this will be the temperature for the rest of the month. We are going to have moisture this weekend, but I don’t think it is 12 inches of snow here for us in North central Iowa. I know you all are wanting spring, and it has been the first day of spring. Spring will come, but we need moisture and the temperature to be more seasonable, so June and July will be that way.
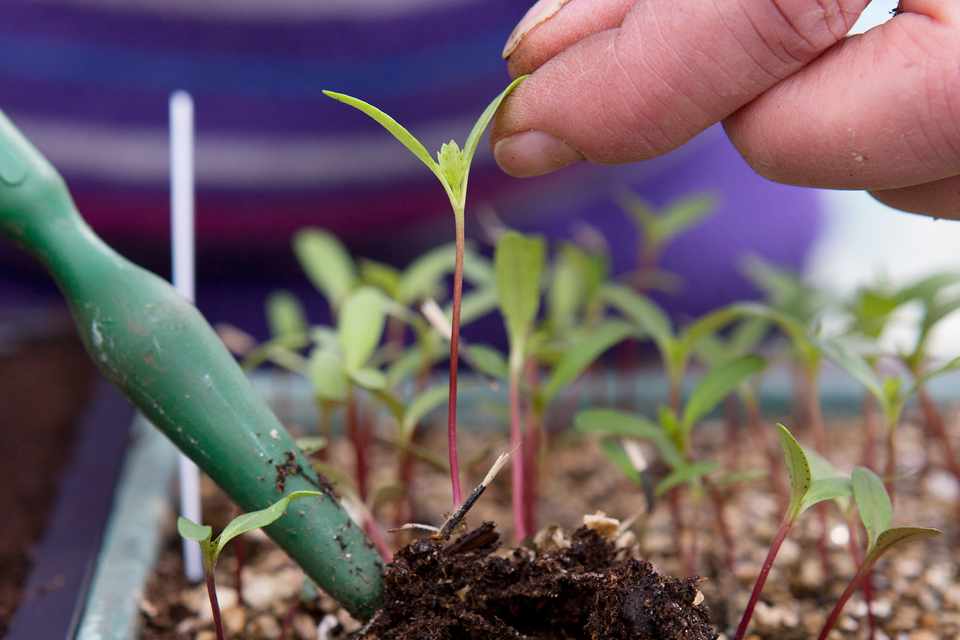
Larry and I were traveling yesterday and going west. As the sun set, the sun was directly in front of us. When the first day of Spring, and the first day of all, the sun sets directly in the western sky and rises directly in the east. Showing us that it was the first day of Spring, now the path of the sun will be setting moving to the north. Busy planting, watering and cleaning up the greenhouse. Question asked, I have tomatoes started now when do I transplant them ? Seeds that we sow…grow into seedlings, that become plants. We start the seeds in starter trays with small seed pods. Once the seeds germinate they become tiny seedlings that have just two sets of leaves.Do not try to transplant at this stage, as your seedlings are still very delicate. Continue to care for them until the next set of leaves begin to emerge. These new leaves are called true leaves. Once true leaves appear, and your seedlings grow double the size of the seed pod, it’s time to transplant to a bigger pot. To remove seedlings, I like to use a bamboo skewer to gently loosen soil from under the roots. Then slowly remove the seedlings, taking care to not disturb the soil near the roots. If you have multiple seedlings in one pod….you will have to separate them carefully without straining the roots too much. I like to transplant them in groups of two seedlings to one pot. Try not to hold the stem of the seedlings, if they snap, your seedling will be lost. Instead maneuver the plant gently into the new pot by carefully dangling the leaves between your fingers. If you happen to lose a leaf….it can still grow back. Put some moist soil in the base of the new pot. Place the seedling in the center and taking great care, press soil gently around the seedling. Try to straighten and center the seedling in the new pot, by moving the soil around it. Do not try to adjust the seedling by the stem! After transplanting, gently spray with water and keep in a sunny spot. You will find, once transplanted …your seedlings start to grow very rapidly. Continue to care for them with good sunlight and water till they grow into small plants and become double the size of the pot they are in. At this stage you can either transplant them to a bigger pot or plant them directly into your vegetable patch. Taken from https://greenfellas4you.com/tips-for-transplanting-seedlings/ Till next time this is Becky Litterer, Becky’s Greenhouse, Dougherty Iowa beckmall@netins.net 641-794-3337 cell 641-903-9365 image from lovethispic.com Good morning, first day of spring…Temperature is 36 degrees high today of high of 55 degrees. Clear skies and that will be what we have all day. Low tonight of 19 degrees. This is exciting to have spring, but Mother Nature is going to let us know this weekend WINTER isn’t over. Big snowstorm coming just don’t know where it will be or how much snow. I have seen 8 inches to 12 inches over Friday till Tuesday. Stay safe all. Here we go!
Welcome, vernal equinox! In 2024, the first day of spring is Tuesday, March 19 The word equinox comes from the Latin words for “equal night”—aequus (equal) and nox (night). On the equinox, the length of day and night is nearly equal in all parts of the world. This egg folklore became popular in 1945 following a LIFE article about the spring practice. “The origins of this myth are attributed to stories that the ancient Chinese would create displays of eggs standing on end during the first day of spring,” according to John Millis, assistant professor of physics and astronomy at Anderson University in South Carolina. “The ancient Chinese celebrated the first day of spring about six weeks earlier than the equinox”—not just on the equinox itself. As with most folklore, it’s only partly true. You should be able to balance an egg on its end on the equinox, but it’s possible to balance an egg on other days, too! Folklore or not, this egg trick sounded like fun to us. One spring, a few minutes before the vernal equinox, several Almanac editors tried this trick. For a full workday, 17 out of 24 eggs stood on end. Three days later, we tried this trick again and found similar results. Perhaps three days after the equinox was still too near. Perhaps the equinox has nothing to do with it. Perhaps we just don’t like to take ourselves too seriously! Try this yourself and let us know what happens. (Tip: You’ll probably have better luck balancing an egg if you try it on a rough surface or use an egg that has a bumpy end. Taken from https://www.almanac.com/content/first-day-spring-vernal-equinox Till next time this is Becky Litterer, Becky’s Greenhouse, Dougherty Iowa beckmall@netins.net 641-794-3337 cell 641-903-9365 image from gardenwhisper.com Good morning. The temperature at 10:00 AM is at 23 degrees and only a high of 37 low of 27 degrees. Cloudy now, but the forecast says for sunny. We will see. Back to winter coats, but I say this is ok. More seasonable weather spring will come with in the right time of the calendar.
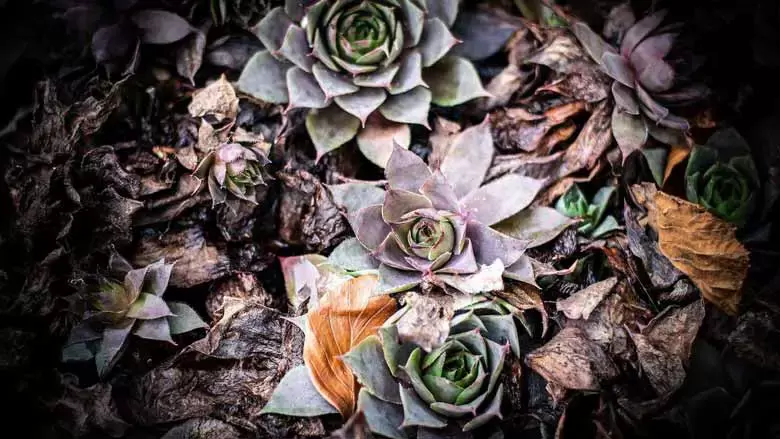
Personally, I am glad I didn’t take down the plastic walls because it was too warm and even too hot to work. Now the plastic walls are keeping the heat in 1/3 of the greenhouse we are heating and the plants are happier. Speaking of plants, we have lots of the plug tray here so planting will really continue and start. More hours at the greenhouse and less in the house and in the office. I do love this and take what gets done, gets done and it will come. I had a question about dying succulents. Here is what I found out. Why Is My Succulent Dying? By ALEXANDRA JONES Succulents are known for being hardy, low-maintenance plants, but that doesn't make them indestructible. Any succulent—including aloe, jade, echeveria, and haworthia—can be damaged or killed by improper care, the wrong conditions, or pest problems. Knowing how to identify and treat the issue can revive the plant before it's too late. If you're wondering why your succulents are dying, there's still hope. Once you diagnose the reason, you can use these tips to treat the problem and save your succulents. Here are six ways to save a dying succulent, plus steps for identifying the issue. Why Your Succulents Are Dying Before you can revive a dying succulent, you need to diagnose the problem. Overwatering, root rot, too much or not enough light, and pest infestations can all damage or kill succulents. First, examine the plant closely for pests. Look for signs that indicate scale (flat brown spots and sticky honeydew), mealybugs (white cottony masses), webbing (spider mites), or fungus gnats (small insects on or hovering around the soil surface). You'll also want to check out the leaves and stems. Soft, squishy leaves that may appear translucent and mushy, discolored stems are signs of overwatering. Leaves that are shriveled or brown and dry can indicate a lack of water. Look for signs of light issues, too. Dull color or a faded appearance, leggy or sparse growth, and loss of variegation can all indicate that your plant isn't getting enough light. Although many succulents require bright, direct sunlight, others need less harsh conditions. Tan or brown patches on leaves can indicate sunburn from too much light. Tip Dying or damaged leaves or stems can indicate a problem. But the occasional dead leaf, especially lower on your succulent's stem, is completely normal and nothing to worry about. Cut Back on Watering If your succulent appears to be overwatered, the first step is to stop watering immediately. In mild cases, you may be able to simply let the soil dry out and trim away any damaged leaves. Allow the soil to dry out completely before watering again. Repot in Fresh Soil In a severe case of root rot caused by overwatering, repotting may be necessary to save your plant. Use clean, sharp shears to cut away affected leaves. Remove the plant from its pot and examine the roots, trimming away any that are black and mushy. If rot is severe, it may be necessary to cut away all but unaffected stem tips or rosettes and replant those to propagate a new plant. Use fresh succulent soil with lots of drainage, and consider repotting into a terra cotta container, which wicks away moisture more quickly than plastic or glazed ceramic. Water Deeply If you haven't watered your succulent in quite a while and its environment is very hot, dry, and sunny, underwatering could be to blame. Give the soil a deep soaking, or try bottom watering the plant to rehydrate the soil. Going forward, allow the soil to dry out between waterings, but don't go too long without giving your plant a drink. Increase Light Leggy, etiolated, and faded succulents that are growing slowly or not at all may not be getting enough light. Succulents like prickly pear cactus, senecio, echeveria, aloe, and paddle plants all grow best in bright, direct sunlight, just to name a few. Move plants closer to a light source—ideally a south-facing or west-facing window—or use a grow light. Reduce Light On the other hand, some succulents can't handle harsh direct sunlight, even indoors. Lower-light succulents that can tolerate part shade include bear paw, aloe, haworthia, mistletoe cactus, snake plant, and ponytail palm. If you're seeing light brown or dry-looking spots on leaves and stems, your plant could be getting sunburned in its current conditions. Move it further from the light source or into an east-facing window, which gets milder light. Treat for Pests If you've identified houseplant pests as the reason your succulents are dying, you can take steps to treat the infestation. Dab away pests with a cotton swab or ball dipped in rubbing alcohol while avoiding getting alcohol on the stems or leaves to prevent damage. You can also wash them away with insecticidal soap or use organic pesticides to get rid of the bugs but make sure they're safe for indoor use. Taken from https://www.thespruce.com/why-is-my-succulent-dying-7558551 Till next time this is Becky Litterer, Becky’s Greenhouse, Dougherty Iowa beckmall@netins.net 641-794-3337 cell 641-903-9365 |

AuthorHi! My name is Becky and I am a Master Gardener. I own Becky's Greenhouse in Dougherty, Iowa. Archives
March 2024
Categories |


 RSS Feed
|